Can You Skim Coat Over Wallpaper: Expert Tips and Techniques
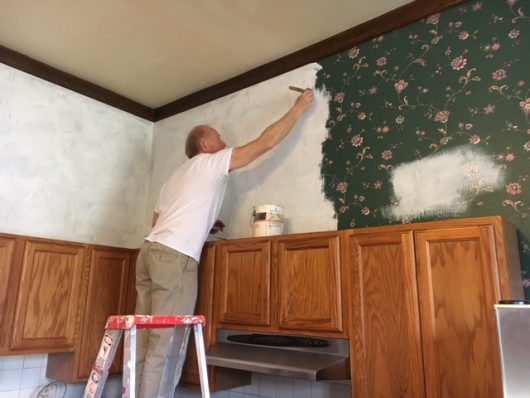
Yes, you can skim coat over wallpaper. It requires preparation and the right materials.
Many homeowners face the challenge of outdated or damaged wallpaper. Removing it can be messy and time-consuming. Skim coating offers a simpler alternative. It involves applying a thin layer of joint compound to create a smooth surface. This method can save time and effort.
But it’s essential to prepare the wallpapered wall properly. This ensures the skim coat adheres well and provides a lasting finish. In this post, we will explore the steps and tips for successfully skim coating over wallpaper. By following these guidelines, you can refresh your walls without the hassle of wallpaper removal.
Assessing Wallpaper Condition
So, you’re thinking about giving your walls a fresh look by skim coating over your old wallpaper. But before diving into the project, it’s crucial to assess the condition of your existing wallpaper. This step can save you time, money, and headaches down the road. Let’s break it down into manageable parts.
Checking For Adhesion
The first thing you need to do is check how well the wallpaper is sticking to the wall. If the wallpaper is peeling or bubbling, it’s a sign that it might not be the best candidate for skim coating. To test the adhesion, try the following:
- Run your hands over the wallpaper. Is it smooth or does it feel like it’s coming away from the wall?
- Use a utility knife to cut a small ‘X’ in the wallpaper. Gently pull back the edges. If it comes off easily, the adhesion is poor.
- Look for any obvious signs of lifting at the seams or corners.
If the wallpaper is firmly attached, you’re in good shape to proceed with skim coating. If not, you might need to reconsider your approach.
Identifying Problem Areas
Next, you need to identify any problem areas that could affect your skim coating project. This includes:
- Water Damage: Look for stains or discoloration. These could indicate underlying issues like mold or mildew.
- Tears and Holes: Check for any tears or holes in the wallpaper. These will need to be patched before you start skim coating.
- Texture and Patterns: If the wallpaper has a strong texture or pattern, it might show through the skim coat. You may need to sand it down or use a thicker coat.
Remember, identifying these issues early can help you address them before they become bigger problems. It’s like finding the hidden cracks in your plan – better now than later!
By carefully assessing the condition of your wallpaper, you can ensure a smoother skim coating process. So, roll up those sleeves, grab your tools, and let’s get started on creating that perfect finish!

Credit: www.agardenforthehouse.com
Tools And Materials Needed
If you’ve ever wondered about giving your walls a fresh, smooth look without the hassle of removing old wallpaper, skim coating over it might be your solution. But before you dive into this project, it’s crucial to gather the right tools and materials. Having everything on hand will make the job easier and help you achieve a professional finish. Let’s explore what you’ll need to get started.
Essential Tools
First things first, let’s talk about the tools. These are the must-haves for anyone attempting to skim coat over wallpaper:
- Putty Knife: A wide putty knife is your best friend for spreading the joint compound smoothly over the wallpaper. Aim for one that’s at least 10 inches wide.
- Utility Knife: This will help you cut away any loose or peeling sections of wallpaper.
- Sandpaper: Fine-grit sandpaper (around 120-150 grit) will be needed to smooth out the surface before and after applying the compound.
- Paint Roller and Tray: Use these to apply a primer to your wallpaper before you start skim coating.
- Mixing Paddle: Attaches to a power drill for mixing the joint compound to the right consistency.
Recommended Materials
Now that you know what tools are needed, let’s move on to the materials. These are just as important for ensuring a smooth and lasting finish:
- Joint Compound: This is the main material you’ll be spreading over your wallpaper. Choose a pre-mixed joint compound for ease of use.
- Primer: A good quality primer will help the joint compound adhere better to the wallpaper. Look for one that’s designed for use on wallpaper.
- Painters Tape: Use this to protect areas you don’t want to get joint compound on, like trim and edges.
- Drop Cloths: Skim coating can get messy, so protect your floors and furniture with drop cloths.
- Clean Water: You’ll need this for mixing the joint compound and cleaning your tools.
Having the right tools and materials on hand will not only make the process smoother but also improve the final outcome. When you’re prepared, the job becomes less daunting and more like a fun DIY project. Ready to get started? Gather your tools and materials, and let’s transform those walls!
Preparing The Wallpaper
Skim coating over wallpaper might seem like a daunting task, but with the right preparation, it can be quite manageable. Proper preparation ensures that the skim coat adheres well and provides a smooth finish. Let’s dive into the essential steps you need to take before you start skim coating over wallpaper.
Cleaning The Surface
First things first, you need to clean the wallpaper. This step is crucial because any dirt, grease, or dust can prevent the skim coat from sticking properly.
Here’s a simple method:
- Mix a solution of mild detergent and warm water.
- Use a sponge or cloth to gently scrub the wallpaper surface.
- Rinse with clean water and let the surface dry completely.
Tip: Be gentle to avoid damaging the wallpaper. A clean surface means a better result in the end.
Repairing Damages
Once the wallpaper is clean, it’s time to inspect for any damages. Look for tears, bubbles, or loose edges. These imperfections can cause issues when you apply the skim coat.
Follow these steps to repair damages:
- Tears and Holes: Use wallpaper adhesive to fix small tears and holes. Apply the adhesive, press the paper back into place, and smooth it out.
- Bubbles: Use a utility knife to make a small slit in the bubble. Apply adhesive underneath and press the wallpaper flat.
- Loose Edges: Apply wallpaper paste under any loose edges and press firmly to secure.
Remember: Allow repairs to dry completely before moving on to the next step.
By thoroughly cleaning and repairing the wallpaper, you create a solid foundation for your skim coat. This preparation step is key to achieving a smooth, professional finish.
So, are you ready to start your skim coating project? With these preparation tips, you’re well on your way to a beautifully smooth wall!

Credit: m.youtube.com
Applying The Skim Coat
If you’ve decided to skim coat over wallpaper, you’re in for a bit of a challenge, but it’s nothing you can’t handle! Applying a skim coat can give your walls a smooth, fresh look. It’s a handy skill to master, especially when dealing with older homes. Let’s dive into the process, step by step.
Mixing The Compound
Before you start, you need to mix the compound properly. Think of it like making a cake – you want the right consistency! Here’s how you can do it:
- Grab a bucket and fill it halfway with water.
- Slowly add the joint compound powder, stirring as you go.
- Mix until it’s smooth, like thick pancake batter. No lumps allowed!
Remember, patience is key. Take your time to get it just right. A smooth mix will make your job much easier and give better results.
First Coat Application
Now, the fun begins! Applying the first coat can be a bit tricky, but with a steady hand, you’ll get the hang of it.
- Using a wide putty knife or a trowel, scoop some compound onto the blade.
- Start at the top of the wall and work your way down, applying the compound in thin layers.
- Spread it evenly, covering the wallpaper completely.
- Don’t worry about small ridges or lines – you’ll sand those out later.
Tip: Keep your tools clean. Wipe off excess compound regularly to avoid clumps.
Applying the first coat is kind of like the first pancake – it might not be perfect, but it sets the stage for the rest. Take a break, admire your work, and get ready for the next steps.
Smoothing And Sanding
Smoothing and sanding play a crucial role in achieving a flawless skim coat over wallpaper. These steps ensure the surface is even and ready for painting. Without proper smoothing and sanding, the final finish may appear uneven or rough. Let’s dive into some effective techniques for a smooth finish and the importance of sanding between coats.
Techniques For A Smooth Finish
To achieve a smooth skim coat, use a wide drywall knife or trowel. Apply thin layers of joint compound. Start from the top and move downwards. Hold the knife at a 30-degree angle. Spread the compound evenly. Avoid putting too much pressure. This prevents gouges and ridges. Work in small sections to maintain control.
After the first coat dries, inspect for imperfections. Fill in any gaps or low spots. Use a light touch to avoid creating new bumps. Consistency is key. Aim for a surface that is as smooth as possible.
Sanding Between Coats
Sanding between coats is vital for a professional finish. Use fine-grit sandpaper, around 220 grit. Lightly sand the entire surface. Focus on any high spots or ridges. Make sure to wear a mask to avoid inhaling dust.
After sanding, wipe down the surface with a damp cloth. This removes any dust particles. A clean surface ensures the next coat adheres properly. Repeat the process of applying compound and sanding until the wall is smooth.
With these methods, you can achieve a smooth and flawless skim coat over wallpaper.
Final Touches
When it comes to giving your walls a fresh, smooth look, the final touches in the skim coating process are crucial. After all, you’ve done the hard work of applying the skim coat; now it’s time to ensure everything is perfect. This stage is all about refining the finish and making sure that your walls are flawless. Let’s dive into the essential steps for the final touches: inspecting for flaws and applying a primer.
Inspecting For Flaws
Once your skim coat has dried, it’s time to inspect your work. This step is like being a detective – you need to look for any imperfections that might have been missed. Small bumps, ridges, or air bubbles can ruin the smooth look you’re aiming for.
- Use a bright light to highlight any flaws on the surface.
- Run your hand over the wall to feel for any rough spots.
- Mark any imperfections with a pencil for easy identification.
Personally, I like to use a flashlight held at an angle to the wall. It casts shadows on any bumps or dips, making them easier to spot. Don’t rush this step – patience here will pay off with a beautiful finish.
Applying A Primer
After addressing any flaws, the next step is to apply a primer. Priming is essential because it prepares the surface for paint and ensures even coverage. Think of it as the foundation for your wall’s makeup.
When choosing a primer, opt for a high-quality product that’s suitable for the type of paint you plan to use. Here’s a simple guide to applying primer:
- Stir the primer thoroughly to ensure an even consistency.
- Use a roller for large areas and a brush for edges and corners.
- Apply a thin, even coat, and let it dry completely.
Remember, the primer might look patchy when you first apply it. Don’t worry – this is normal. It will provide an excellent base for your paint, giving your walls a professional finish.
By taking the time to inspect for flaws and applying a primer correctly, you set the stage for a stunning final result. So go ahead, put on some music, grab your tools, and enjoy the process of transforming your space!
Common Mistakes To Avoid
Skim coating over wallpaper can lead to poor adhesion and peeling. Removing wallpaper first ensures a smooth, long-lasting finish. Avoid shortcuts for best results.
Skim coating over wallpaper might seem easy. But many make mistakes. These errors can lead to poor results. Knowing what to avoid helps in achieving a smooth finish. Here are common mistakes to avoid.Skipping Preparation Steps
Preparation is key. Some skip cleaning the wallpaper. This leaves dust and dirt. These can affect the skim coat. Others forget to fix loose wallpaper. It can cause bubbles and wrinkles. Always clean and secure the wallpaper first.Using Incorrect Materials
Using the right materials is crucial. Some use the wrong type of joint compound. This can lead to cracks. Others choose the wrong primer. It can affect the adhesion. Always select materials designed for skim coating. Check labels and instructions. This ensures a durable and smooth finish. “`
Credit: www.reddit.com
Expert Tips
If you’re thinking about giving your walls a fresh, smooth look by skim coating over wallpaper, you’re not alone. This technique can be a lifesaver, saving you time and hassle. But, it does require a bit of know-how to get it right. In this section, we’ll explore some expert tips that can make the process easier and help you achieve professional results. Let’s dive in!
Time-saving Techniques
Time is of the essence, especially when tackling home improvement projects. Here are some tried-and-true techniques to save you precious hours:
- Prep Work is Key: Before you start, make sure the wallpaper is clean and free of dust. Use a damp cloth to wipe down the walls. This ensures better adhesion of the skim coat.
- Use a Quality Primer: Applying a high-quality primer over the wallpaper can make a big difference. It helps the skim coat adhere better and prevents bubbling.
- Work in Sections: Instead of tackling the entire wall at once, break it down into manageable sections. This approach makes it easier to maintain a wet edge and achieve a smoother finish.
Achieving Professional Results
Everyone loves that professional, polished look. Here’s how you can achieve it without hiring a pro:
- Choose the Right Tools: Invest in a good quality trowel and joint compound. Cheap tools can leave streaks and imperfections.
- Apply Thin Layers: Don’t try to cover everything in one go. Apply several thin layers, allowing each to dry completely before applying the next. This reduces the risk of cracks and bubbles.
- Sanding is Your Friend: Once the skim coat is dry, lightly sand the surface to smooth out any imperfections. Use fine-grit sandpaper for the best results.
- Patience Pays Off: Take your time with each step. Rushing through the process can lead to mistakes and a less-than-perfect finish.
Remember, even the experts had to start somewhere. With these tips, you’ll be well on your way to achieving a flawless skim coat over wallpaper. Happy renovating!
Frequently Asked Questions
Can You Put Skim Coating Over Wallpaper?
It is not recommended to skim coat over wallpaper. The coating may not adhere properly and can cause peeling. Removing the wallpaper first ensures a smooth and durable finish.
Do You Need To Remove Wallpaper Before Skimming?
Yes, remove wallpaper before skimming. It ensures a smooth surface and better adherence of the new plaster.
How Can I Cover Wallpaper Without Removing It?
Apply a primer on the wallpaper. Then paint over it or use peel-and-stick wallpaper for a new look.
How Much Does It Cost To Skim Coat Over Wallpaper?
Skim coating over wallpaper typically costs $1 to $3 per square foot. Prices vary based on location and contractor.
Conclusion
Skim coating over wallpaper is possible but tricky. Proper preparation is crucial. Ensure the wallpaper is secure. Clean and dry the surface. Use a high-quality primer first. Apply the skim coat evenly. Allow it to dry fully. Sand the surface for smoothness.
Repeat if necessary. Patience and careful steps lead to success. Skim coating over wallpaper can refresh your walls. Always assess the condition first. Consider professional help if unsure. Happy renovating!

My name is Maria, A professional merge game player with years of experience mastering games like Merge Dragons, Merge Gardens, Merge Mansion, and more. My passion for uncovering the best strategies, solving tricky puzzles, and discovering hidden secrets led her to create MergeGameplay.com.


